
PREPARATION TIME: 30 minutes | AGE: 1.5 - 3 years old
PREP WORK
All egg dyeing methods below are sensorial, fun and messy. To prepare the workspace set up a clean and suitable area for the activity. Lay down some kitchen towels/ newspapers/ baking paper to protect the surface.
Ensure that the eggs are hard-boiled and cooled down to room temperature. You can boil the eggs in advance or involve the child in the cooking process for added engagement.


METHOD 1 RICE + EGG DYE
MATERIALS:
egg dye
boiled eggs
uncooked rice/ pasta
ziplock bags/ small soft container with a lid
paper towels or baking paper
optional - disposable gloves
INSTRUCTIONS:
Open the container/ ziplock bag and pour a small amount of uncooked rice or pasta. The amount should be enough to cover the surface of the egg.
Choose your desired egg dye. Encourage the child to get creative by combining different colors. Pour a few drops of dye into the container on top of the pasta or rice.
Carefully place one hard-boiled egg into the container, making sure it is centered among the pasta or rice.
Close the container/ ziplock bag securely (ensuring there is no air trapped inside if using a ziplock bag). Double-check that the container/ bag is tightly closed to prevent any leaks.
Holding the container/ bag with both hands, gently roll the egg around, allowing the pasta or rice to coat the surface of the egg. The colors will transfer and create marbled patterns as they mix.
Take each egg out of the container/ bag and place them on a kitchen towel. Allow the eggs to dry completely. The pasta or rice can be saved for future craft projects or discarded.
METHOD 2 SHAVING FOAM + EGG DYE
MATERIALS:
shaving foam/ whipped cream
egg dye
boiled eggs
shallow container or baking dish
paper towels or baking paper
optional - disposable gloves
INSTRUCTIONS:
Take the shallow container and fill it with a layer of shaving foam/ whipped cream. Ensure that the layer is thick enough to roll the eggs in.
Squeeze a few drops of egg dye onto the shaving foam. You can use one color or multiple colors to create a marbled effect. Feel free to experiment with different combinations.
Invite the child to take the boiled eggs and gently roll them in the shaving foam. Encourage them to cover the entire surface of the eggs with the foam and food coloring mixture. This will create a marbled pattern on the eggs.
Once the eggs are coated with the foam and food coloring, carefully remove them from the container. Use a kitchen towel to clean off the shaving foam from the eggs. Gently wipe away the foam, revealing the marbled pattern underneath.
Allow the eggs to dry: After cleaning off the foam, place the eggs on a separate kitchen towel to allow them to dry completely. This may take some time, so be patient and ensure the eggs are fully dry before handling them further.
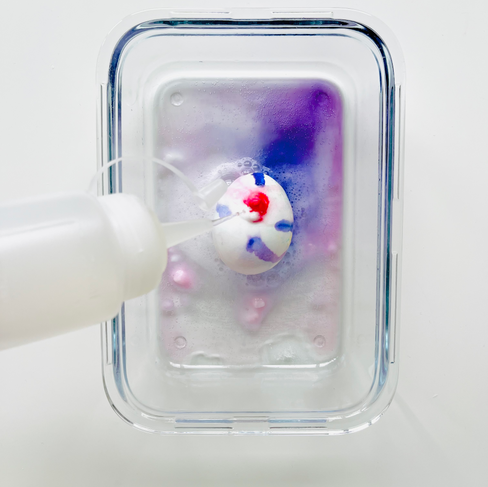
METHOD 3 VINEGAR + BAKING SODA + EGG DYE
MATERIALS:
egg dye
boiled eggs
shallow container or baking dish
baking soda
small container for the baking soda
vinegar
squirt bottle or dropper
paper towels or baking paper
optional - disposable gloves
INSTRUCTIONS:
Place the hard-boiled eggs in a shallow container or baking dish.
Choose your desired egg dye. Encourage the child to get creative by combining different colors. Let them carefully drip or pour the coloring over the eggs, allowing it to spread and create patterns.
Place baking soda into a small container. Explain that the baking soda will create a fizzy reaction when combined with vinegar.
Encourage the child to take the baking soda container and gently pour it over the eggs, covering them evenly with a fine layer of baking soda.
Fill a squirt bottle or dropper with vinegar.
Ask the child to squirt or drop vinegar onto the eggs. As the vinegar reacts with the baking soda, it will create a foaming and fizzing effect, causing the colors to intensify and spread.
Once the child is satisfied with the colors and patterns, remove the eggs on a paper towel and allow them to dry. This might take around 10-15 minutes. Be cautious when handling the eggs, as the dye may still be wet and may transfer.
METHOD 4 TISSUE PAPER + WATER + EGG DYE
MATERIALS:
egg dye
boiled eggs
shallow container or baking dish
paper towels
rubber bands/ bag clips
spray bottle
water
optional - disposable gloves
INSTRUCTIONS:
Fill the spray bottle with water.
Take a boiled egg and wrap it in a paper towel. Twist the ends of the paper towel together and secure them with a rubber band.
Hold the ends of the paper towel-wrapped egg in your hand and let the child choose colors. Allow the child to drop egg dye onto the paper towel.
Encourage the child to use the spray bottle to spray water on the egg.
After the child is done spraying, carefully remove the paper towel to reveal the colourful pattern on the egg. Place the egg on a paper towel and allow it to dry.
DEVELOPMENT AREAS:
FINE MOTOR SKILLS: Methods 1, 2, and 4 involve handling small objects such as eggs, dye, rice/pasta, shaving foam, and tissue paper. Children practice gripping, pouring, rolling, and manipulating these materials, which helps enhance their fine motor skills.
SENSORY EXPLORATION: All methods engage children in sensory experiences through the use of different textures, colors, and smells. They explore the smooth surface of eggs, the grainy texture of rice/pasta, the fluffy consistency of shaving foam, and the absorbency of tissue paper. Sensory exploration supports cognitive development and stimulates curiosity.
CREATIVITY AND IMAGINATION: Each method encourages children to explore their creativity by combining colors, experimenting with patterns, and creating unique designs on the eggs. They have the freedom to mix and match colors, observe color transformations, and invent new patterns, fostering imaginative thinking and self-expression.
SCIENTIFIC INQUIRY: Method 3 introduces a simple chemical reaction between vinegar and baking soda, which results in a foaming and fizzing effect. Children observe and explore this reaction, learning about basic chemistry concepts in a hands-on way. They can make observations about color changes, bubbles forming, and the release of carbon dioxide gas.
FOLLOWING INSTRUCTIONS: Following the step-by-step instructions for each method helps children develop their ability to follow directions, sequence events, and complete tasks with assistance.
PATIENCE AND PERSISTENCE: All methods require waiting for certain steps, such as allowing eggs to dry or observing chemical reactions. Engaging in these activities teaches children patience, as they learn to wait for results and understand that some processes take time to complete.